TIL 👩🏻💻
TIL : Chatterbox Client
heesue
2021. 4. 29. 23:50
HTTP에 대한 개념을 바탕으로 fetch API를 활용해 서버에 메시지를 요청하고 보내는 과정을 스프린트로 진행했다. 이번에 대부분의 코드는 singleton 패턴으로 작성했다. (싱글톤 패턴 : 똑같은 인스턴스를 여러 개 만들지 않고, 기존에 생성했던 동일한 인스턴스를 사용하는 패턴)
1. Chatterbox Client
index.html에서는 어드밴스드 과제로 clear 버튼만 넣어줬고 나머지는 app.js에서 코드를 짰다. 싱글톤 패턴을 처음 접해서 낯설었지만, 페어가 잘 맞는 분이셔서 같이 얘기하면서 차근차근 해결했다. 아직은 get, post 모두 왜 이 코드를 사용하는지 몰라도 이게 패턴처럼 사용되는 느낌이라 문서들을 참고하며 적절히 변형했다.
const githubID = '내 깃헙아이디'
const app = {
server: `http://3.36.72.17:3000/${githubID}/messages`,
init: () => { // 페이지가 로딩될 때 처음 실행되는 함수. 페이지에 챗들을 보여준다.
app.fetch((data) => {
console.log(data)
return data.forEach(app.renderMessage);
})
},
fetch: (callback) => { // GET 메서드
window.fetch(app.server)
.then((res) => {
return res.json();
})
.then(callback)
},
send: (message, callback) => { // POST 메서드
window.fetch(app.server, {
method: 'POST',
headers: {
'Content-Type': 'application/json',
},
body: JSON.stringify(message)
}).then((res)=> {
return res.json();
}).then(callback)
},
clearMessages: () => { // 챗 목록 지우기
document.querySelector('#chats').innerHTML = '';
},
clearForm : () => { // 메시지 입력 부분 지우기
document.querySelector('.inputUser').value = '';
document.querySelector('.inputChat').value = '';
},
renderMessage: (message) => { // 메시지 추가
let newChat = document.createElement('div');
let name = document.createElement('div');
let chatting = document.createElement('div');
newChat.classList.add('chat');
name.classList.add('username');
chatting.classList.add('text');
name.textContent = message.username
chatting.textContent = message.text;
newChat.append(name, chatting);
chats.prepend(newChat);
},
// renderMessage: ({ username, text }) => {
// const tmpl = `<div class="chat">
// <div class="username">${username
// .replace(/</g, '<')
// .replace(/>/g, '>')}</div>
// <div>${text
// .replace(/</g, '<')
// .replace(/>/g, '>')}</div>
// </div>`;
// document.querySelector('#chats').innerHTML =
// tmpl + document.querySelector('#chats').innerHTML;
// },
reset: () => {
return window.fetch(`http://3.36.72.17:3000/${githubID}/clear`, {
method: 'POST'
})
.then((res) => res.json())
.then((data) => app.clearMessages(data))
}
};
app.init();
const chats = document.querySelector('#chats');
const submit = document.querySelector('.submitButton')
if (submit) {
submit.addEventListener('click', function(event) {
event.preventDefault();
let result = {
username: document.querySelector('#user').value,
text: document.querySelector('#txt').value
}
app.send(result);
app.renderMessage(result);
app.clearForm();
})
}
const clear = document.querySelector('.clearButton');
if (clear) {
clear.addEventListener('click', function(event) {
event.preventDefault();
if (confirm('초기화하겠습니까?') === true) {
app.reset();
} else {
return;
}
})
}
// 테스트를 위한 코드
if(window.isNodeENV){
module.exports = app;
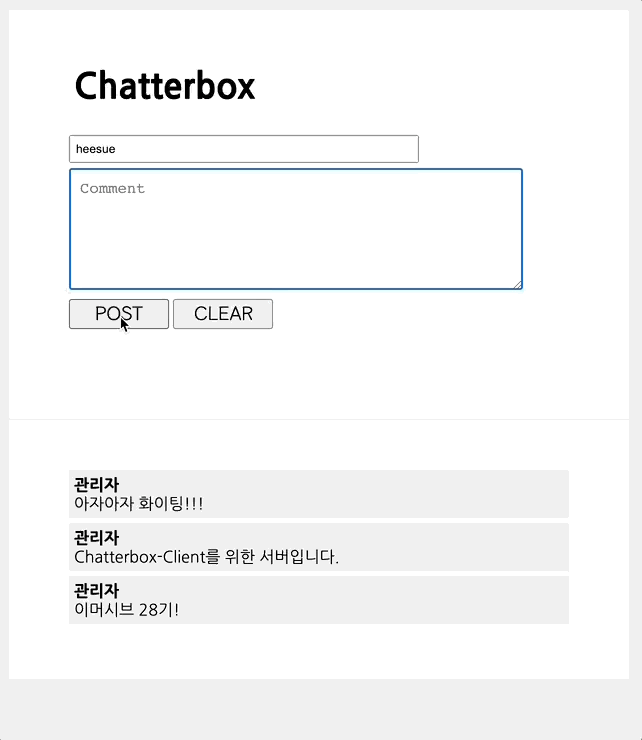
}2. 실제 실행 화면 👀
- 처음에는 clear 버튼을 눌렀을 때 보이기만 지워지고 서버에는 아직 정보가 남아있었다. 서버 내용까지 지워보고 싶어서 코드를 수정했고 기능이 잘 구현되었다!!
- 아쉬웠던 점은 이번에는 서버를 익히고 fetch API 활용에 집중하다 보니 CSS는 하나도 건드리지 않았다ㅠㅠ 시간 될 때 카카오톡처럼 CSS를 꾸며보고 싶다!!